This guide details how to deploy Traefik using Docker compose (with Dockge) and Cloudflare as our DNS Challenge provider to generate Let’s Encrypt certificates for local infrastructure (not internet-accessible) and use basic authentication to protect the Traefik Dashboard. The configuration files presented can also be used with other deployment methods, such as Unraid.
This guide details how to deploy Traefik using Docker compose (with Dockge) and Cloudflare as our DNS Challenge provider to generate Let’s Encrypt certificates for local infrastructure (not internet-accessible) and use basic authentication to protect the Traefik Dashboard. The configuration files presented can also be used with other deployment methods, such as Unraid.
Revision: 20250210-0 (init: 20240831)
This post details installing the Traefik Proxy using docker compose (with Dockge). We perform a deployment using a traefik.yaml configuration file and dynamic independent configurations to provide proxying for docker containers and external services.
Traefik is an open-source reverse proxy and load balancer designed for cloud-native applications. It is particularly suited for microservices and containerized environments like Docker and Kubernetes.
Traefik serves several key functions:
Automatic Service Discovery for Docker services and routes traffic to them without requiring manual configuration (when enabled)
Load Balancing for HTTP, TCP, and UDP traffic.
It supports SSL/TLS termination and automatically generates certificates using ACME providers like Let's Encrypt.
Dynamic Configuration: It continuously updates its configuration in real-time, eliminating the need for restarts or manual updates when services are added or removed.
It includes various middleware options for tasks such as authentication or rate limiting.
Traefik is based on the concept of EntryPoints, Routers, Middlewares and Services.
The main features include dynamic configuration, automatic service discovery, and support for multiple backends and protocols.
EntryPoints: EntryPoints are the network entry points into Traefik. They define the port which will receive the packets, and whether to listen for TCP or UDP.
Routers: A router is in charge of connecting incoming requests to the services that can handle them.
Middlewares: Attached to the routers, middlewares can modify the requests or responses before they are sent to your service
Services: Services are responsible for configuring how to reach the actual services that will eventually handle the incoming requests.
Acknowledgments
The configuration files for this guide were developed thanks to the many other great primers, in particular:
Please review the Preamble and Prerequisites section of a previous blog post on Reverse Proxy for some of the concepts we will use here.
To use this guide, you must have a DNS hosted at Cloudflare.
Pre-requisite:
An A record for *.example.com (wildcard) setup at Cloudflare pointing to the private IP on the host that will host Traefik: 192.168.22.11
Type: A / Name: * / Content: 192.168.22.11
A custom Cloudflare Token:
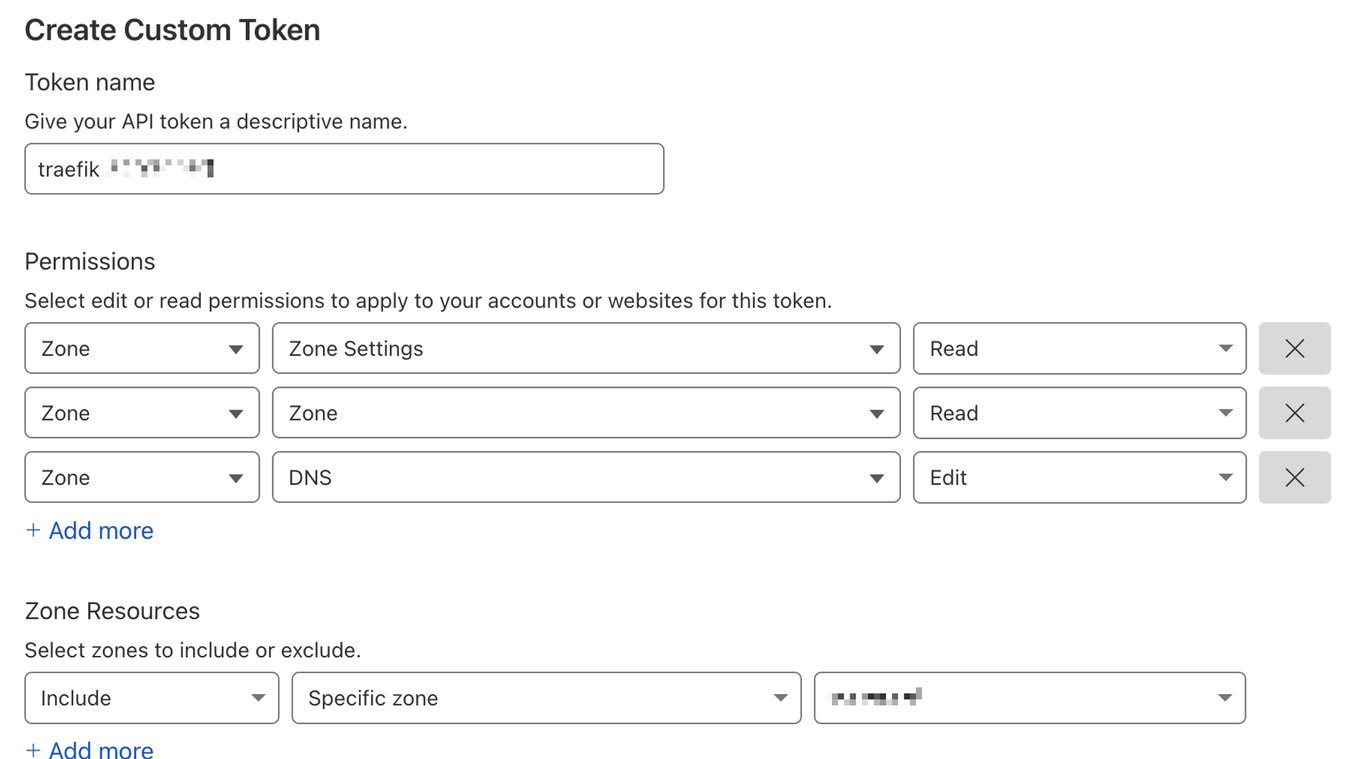
From the Cloudflare Dashboard, on the “Overview” section, look for “Get your API token” (on the left side), then “Create Token → Create Custom Token”
Custom Token: Zone Read + Zone DNS Edit + only specific zone
Give it a name, for example, traefik (example.com)
For “Permissions”, select:
“Zone - Zone Settings - Read” and “Zone - Zone - Read” to allow the token to Read DNS Zones
“Zone - DNS - Edit” to enable the token to edit DNS records (required for the DNS-01 challenge)
For “Zone Resources”, select:
“Include - Specific Zone” select the example.com zone.
After the token is created, store it in a safe place; it will not be displayed again.
Docker compose setup
👉
We will use Dockge to deploy Traefik. Please refer to a previous Dockge post for details on setting it up.
From the Dockge dashboard, “+Compose” a new traefik stack and “Save” it (do not deploy just yet).
We need to prepare a few files in the /opt/stacks/traefik directory (make sure you can write in the directory):
# Create the configuration base directory (config)
# and the dynamic configuration directory (conf)
mkdir -p config/conf
# Create an empty acme.json file to store our Certificates details
touch config/acme.json
# Change the file permission. An error will occur if this is not done
chmod 600 config/acme.json
Although we are deploying this setup using Dockge, it is possible to use the following files with other deployment methods, such as Unraid’s Community Applications — in which case we would not use the provided compose.yaml file and use the Unraid template’s environment variables to pass some values.
We added comments to the file to help you review its content and adapt some sections accordingly. Among the settings, the file sets:
the global: section checks for updates and disables usage reporting
the api: section enables the dashboard (we will specify its URL on the command line)
the entrypoints: section sets the http and https ”entrypoints” which will be used by our “routers” configuration.
The http settings always redirect entries to the https.
The https settings specify the certResolver name we will use and the domains used, including our *.example.com wildcard certificate.
the middlewares section specifies some @file rules; they will be defined in the config/conf directory.
we modified the default readTimeout from 60 seconds to 30 minutes to support requests that might take longer than the default (for example, the docker layer uploads to a local registry).
the providers: section sets
the file ”providers” as the content of the conf directory
the docker ”provider” for
containers that are on the traefik_default network (this network will be created by Dockge when the stack is started)
container are not exposed by default: a traefik.enable label must be set to true for the container to be seen by Traefik (see the whoami example in the compose.yaml file)
will automatically name the resulting URL as the container’s name (ex: dozzle.example.com). In case of potential service collisions, renaming each container is an option or a rule label can be used: traefik.http.routers.my-container.rule=Host(`container-url.example.com`)
the certificatesResolvers: section is where the ACME exchange with Let’s Encrypt using Cloudflare for the DNS Challenge is performed.
The resolvers: section will verify that the _acmeTXT entry was added to the Zone (example.com)’s DNS. The recommended entry for Cloudflare is 1.1.1.1. If you have a system that performs DNS over HTTPS upgrades, you will want to point that resolver directly to that system's IP.
Dynamic Configurations (config/conf destination)
💡
Note that the file name does not matter; only the file content does, although it is recommended to name those files so that you can find them later.
The following files are in the /opt/stacks/traefik/config/conf folder and can be downloaded from the same GitHub repo.
tls.yaml
Download the tls.yaml file. This file contains requirements for minimum supported ciphers and TLS versions to access the services.
middlewares-securityHeaders_light.yaml
The middlewares-securityHeaders_light.yaml file defines a limited number of restrictions. It is usable for HTTPS upgrading of private accessible networks only, as it will, among other things, allow iFrames embedding. It is the default entry used by the https entrypoints.
The middlewares-gzip.yaml file specifies that connections should use the gzip compression.
middlewares-dashboardauth.yaml
In the middlewares-dashboardauth.yaml is a basicAuth configuration that we will use to protect the Traefik Dashboard. Modify the user and password values by using htpasswd (an example command line is in the comments).
middlewares-localonly.yaml
Download the middlewares-localonly.yaml file. It defines another “middleware” to limit access to localhost, the LAN subnet (here 192.168.22.1/24, adapt as needed), and commented is the Tailscale 100. range (CGNAT: 100.64.0.0/10). Add the tunnel's network pool to that list if you have another VPN setup to reach your subnet.
We note that we are not using this middleware in any entrypoint.
compose.yaml
Obtain the compose.yaml file and fill the Dockge entry with it. You will need to replace 2x entries with example.com with your domain's value (for the dashboard and the whoami service).
We need to create an environment variable for this stack (replace with the token you obtained earlier) CF_DNS_API_TOKEN=REPLACE_WITH_YOUR_SECRET_API_KEY
Depending on which guide you follow, you will see most entries we placed in configuration files within the command: section of the compose.yaml (ours is empty). In the labels: section we have added definitions for the Traefik dashboard configuration: its URL (the rule entry) and its middlewares (here the dashboardauth@file , i.e. dashboardauth middleware found in a file placed in the directory set in the fileproviders:.
The definition of the whoami stack explains how to have Traefik create a reverse proxy for the service, the traefik.enable=true label tells it to make a rule. The URL would use the container’s name by default, but this is overridden by the rule entry that sets the full URL. This also means the router:’s name is whoami: traefik.http.routers.whoami.rule. This name is again used to specify the entrypoint: traefik.http.routers.whoami.entrypoints=https.
After saving and starting the stack, within a few seconds, you will have some content within the /opt/stacks/traefik/acme.json file, including the email address you specified for Let’s Encrypt and the Certificates for your domain.
Once this is confirmed, the whoami service will be available at https://whoami.example.com/. When accessing it, we will see the connection details, proving that Traefik is up and running and upgrading connections to HTTPs for our example.com domain.
Accessing the Traefik Dashboard is done by going to the URL set in the rule entry of the compose.yaml: https://traefik.example.com/. However, you will be prompted for the username and password you put in the middlewares-dashboardauth.yaml file (the defaults in that file are admin and password).
Adding services
Dockge containers
To add a container existing within Dockge to the list of URLs proxied by Traefik, we need to extend that stack’s compose.yaml with additional content.
We will use the Dozzle service as an example, as detailed in the Dockge post. Stop that stack before editing it.
To have the service recognized by Traefik, we need to
Make the service use the traefik_default network
    networks:
      - traefik_default
, and recognize the network as external to the container:
networks:
  traefik_default:
    external: true
Add labels for the container to be seen by Traefik, specify its URL (rule), and specify the https entrypoint (as defined in our traefik.yaml's entryPoints: section):
After restarting the stack, we can now access it at https://dozzle.example.com/
💡
Because the container_name is dozzle we do not need to add the rule label, as the service url would have been the value of that variable (per the defaultRule for dockerproviders: entry in the traefik.yaml). We recommend the habit of using all three labels.
Adding an external service
To add a proxy for a service not on the Dockge stack or another host, we have to define specific routers and services. Because we are using files to store our configuration, create a new yaml file in the config/conf directory that Traefik is watching. We have added an exampleroute-ollama.yaml in the GitHub with all its content commented (to avoid the content from being used if you copied all the files).
Its uncommented content would be as follows:
http:
  # Routers and Services -- https://doc.traefik.io/traefik/routing/overview/
  routers:
    ollama: # name
      entryPoints:
        - https # use the "https" entrypoint
      rule: 'Host(`ollama.example.com`)' # Destination URL to resolve
      service: ollama # name for services matching entry
#      middlewares: # specify middleware(s) if any
#        - "securityHeaders@file" # the default "https" entrypoint follows the "light" security headers version, uncomment this section to enble the more restrictive version
  services:
    ollama:
      loadBalancer:
        servers:
          - url: http://192.168.22.12:11434/
This defines a new ollama.example.com URL that would reverse-proxy to http://192.168.22.12:11434/ (notice the different IP on our subnet).
Simply adding the file to the folder will enable the new proxied entry.
We have commented on the more restrictive security headers to demonstrate how to include the additional middleware to the default one. If using those as labels, this ollama example would be added using traefik.http.routers.ollama.middlewares=securityHeaders@file
Docker labels
The following are helpful for copy→adapt→paste.
Generic labels
When using Traefik, adding a new service to the reverse proxy can be as simple as extending the labels: section of the compose.yaml file with something akin to:
replace example.com with your domain (1x replacement)
update SLUG to reflect the base URL of the service you are exposing (3x replacements)
Unraid labels
(This is only usable if Unraid was Traefik’s deployment method)
Although it is possible to manually “Add” “labels” for each required label using the Unraid WebUI, modifying the Docker service’s XML file is possible.
Those are in the /boot/config/plugins/dockerMan/templates-user folder and are named my-<SERVICE>.xml. Once we have found the matching entry, we can edit it and copy the adapted lines before the final </Container> line:
SLUG with the base URL of the service whose port you are exposing — this will replace the values in .routers. and Host( (6x replacements)
💡 After modifying the XML file from Unraid’s “Docker” tab, Edit the Service, then make and undo any change to enable the Save button. Save it to restart the updated service.
Propagating labels from Docker instances not on the Traefik host
🙏
Thanks to u/clintkev251 for pointing me to a working solution.
Docker labels work if your containers are on the same host as Traefik.
If those containers are on another host, a tool has to pass the remote labels to the running Traefik instance with details, such as the remote IP, to support the proxy generation. A tool called traefik-kog (https://github.com/jittering/traefik-kop) provides such a solution. Their README.md contains clean instructions, so the details below will be less verbose than the rest of this post.
We have extended the compose.yaml and traefik.yaml on GitHub with commented-out sections to support this setup. Uncomment those and adapt them for your setup.
The tool relies on the redis key-value (KV) store to act as a provider for Traefik (as detailed at https://doc.traefik.io/traefik/providers/redis/). Redis must be accessible by Traefik once installed. You can obtain the redis container from https://hub.docker.com/_/redis/ . For additional deployment options, see the Community Edition details at https://redis.io/docs/latest/get-started/. By default, redis uses port 6379 to communicate. The redis service needs to be accessible to other hosts on the LAN, so its port is exposed. For data persistence, we are separating /data from the running container; this way if the container restarts, it can keep previously added data. It is possible to add a password to communicate with the service. The compose.yaml for an independent Redis container would be similar to:
Once redis is up and running, the next step is to add the providers entry in the traefik.yaml to add a new entry in the providers: section:
  redis:
    endpoints:
      # assumes a redis link with this service name running on the same
      # docker host as traefik
      - "redis:6379"
After restarting the Traefik container to enable this new static configuration, we should see an INF Starting provider *redis.Provider in the output log.
On another host (foo) in our LAN (192.168.222.99 , with Traefik on 192.168.222.11), we will Dockge “+Compose” a new stack entry named traefik-kop with the following compose.yaml content:
After starting the container, we will see a log entry that confirms that the service is connected to the Redis instance: level=info msg="creating new redis store at 192.168.222.11:6379 for hostname foo"
The last step is to add the previous labels to the local containers so that each container can be added to Traefik. For the dozzle example above, with a container on a different host from the Traefik container, we will remove the networks: section (listing the local traefik network) from the compose.yaml, but we will keep the labels for traefik. After starting the service, we should see in the traefik-kop log an entry similar to level=info msg="publishing http://192.168.222.99:8008" service=dozzle-dozzle@docker service-type=http (note the BIND_IP and exposed port).
After a few seconds, you can check the Traefik dashboard at https://traefik.example.com (as defined in the traefik.yaml ). If you search the dozzle service, you will see it added by the Redis provider, and you can reach it at the specified URL.
To see the content within the Redis KV-store, use Redis Insight.
🔑
Because of the way traefik-kop extracts key names for local containers (based in part on the service name), our dozzle stack is named dozzle-dozzle as a key. To avoid KV collisions, it might be prudent to name the service with the host it is running from. Adapting servicse: dozzle_foo: image[...] will create a service=dozzle-foo-dozzle@docker entry instead.
For example, we can integrate Dockge to Traefik and HomePage for host foo :
This service, named dockage-foo, creates a dockage-foo-dockage entry for traefik-kop. That value prevents Redis KV collisions for multiple Dockge services running on multiple hosts.
docker compose setup for HomePage with Dashdot and Watchtower widgets from Komodo or Dockge, including detailing the dashboard setup for a multi-tab layout with four sections of content: system metrics, static content, dynamic applications (docker service discovery), and service monitors.
Dockge deployment of the “Nginx Proxy Manager” reverse proxy to create private-network routable URLs with a Let’s Encrypt wildcard certificate and Cloudflare as our DNS provider.
Linux host set-up instructions for Dockge, a self-hosted Docker Compose stacks management tool with a feature-rich interface for self-hosting and home lab setups. It provides access to an all-in-one view of logs, a YAML editor, a web terminal, container controls, and monitoring.