FLUX.1[dev] with ComfyUI and Stability Matrix (20240824)
FLUX.1[dev] with ComfyUI and Stability Matrix (20240824)
In this post, we will run FLUX.1 [dev] within ComfyUI, proposing two installation methods: 1) with Dockge to run the tool within a docker compose; a server-compatible installation method, 2)using Stability Matrix, a desktop application with easy model integration with multiple inference engines available.
On August 1st, Black Forest Labs announced FLUX. 1, a suite of advanced text-to-image AI models notable for its state-of-the-art performance in image generation. It is characterized by excellent prompt adherence, high visual quality, and diverse output.
ComfyUI is a node-based graphical user interface (GUI) that uses stable diffusion. It allows users to create and customize image generation workflows using a WebUI. It features a modular approach, chaining various blocks (nodes) to build workflows. Common nodes include loading models, entering prompts, and selecting samplers.
Note: To obtain weights and other models, you will require a HuggingFace and a CivitAI account and acceptance of the FLUX.1[dev] terms.
ComfyUI setup
Method 1: Dockge
After looking for an official ComfyUI Docker and not finding one, I created a container (the container itself is 5GB for the base NVIDIA components, and at first run, it will download another 5GB of content for the PyTorch and other ComfyUI requirements).
This container was designed to be run as the end-user to simplify adding models and other checkpoints without being run as root. Decide on the user who will run the container and obtain its uid and gid. On Ubuntu, the default user’s values are 1000 and 1000. We will use those values for the WANTED_UID and WANTED_GID parameters. Adapt those values to your specific requirements.
From our Dockge dashboard, let’s “+Compose" a comfyui-nvidia stack and populate it with the following compose.yaml, but do not “Deploy” it just yet, only “Save.”
We will be exposing the service on port 7188 (instead of the container’s default of 8188), and share our “time”.
With the stack ready to deploy, we must ensure that we can access the base directory and to create a run directory there (compose when started will act as root when creating any volumes: entry not already existing which will prevent our selected user from creating the needed directories within):
cd /opt/stacks/comfyui-nvidia
# make it owned by the shell user
# adapt the UID:GID if this user is not the one that used in the compose file
sudo chown `id -u -n`:`id -g -n` .

mkdir run
Because the built container is set to run using the WANTED_UID and WANTED_GID, all the files in the created directories will be accessible without the need for a sudo. Please see the GitHub for up to date details:
Among the folders that will be created within run are HF, ComfyUI, venv
HF is the expected location of the HF_HOME (HuggingFace installation directory)
ComfyUI is the git clone version of the tool, with all its sub-directories, among which:
custom_nodes for additional support nodes, for example ComfyUI-Manager,
models and all its sub-directories is where checkpoints, clip, loras, unet, etc have to be placed.
input and output are where input images are to be placed and generated images will end up.
venv is the virtual environment where all the required python packages for ComfyUI and other additions will be placed. A default ComfyUI package installation requires about 5GB of additional install in addition to the container itself; those packages will be in this venv folder.
After a “Start” we can go port to 7188 of the service’ host IP or http://HOST_IP:7188/ and access the WebUI.
When started for the first time, the container will perform a few actions, among which download and install ComfyUI, setup a virtual environment for its required packages, install ComfyUI Manager. After the WebUI is available, it is recommended to “Stop” the “comfy-nvidia” stack then restart it. The reason for this extra step is that the ComfyUI Manager configuration file is generated during this first run that the container will alter on re-run to allow custom nodes installation (one of its very useful feature).
When the WebUI is started, an example workflow will appear; place a checkpoint file in the run/ComfyUI/models/checkpoints folder, “Refresh” the UI and test it.
Note: Unraid
The same container is available for Unraid users; I am awaiting for it to be available in the Community Apps.
Method 2: Stability Matrix
“Stability Matrix” is a Multi-Platform Package Manager for Stable Diffusion that can be found at https://github.com/LykosAI/StabilityMatrix. If the tool proves useful to you, on their GitHub page, you will find sponsorship opportunities (at the time of writing this post, I have been one of their Patreon sponsor for a few months).
Stability Matrix provides a streamlined interface for installing and managing various Stable Diffusion Web UIs (ComfyUI, Foocus, Automatic1111, etc) without requiring system dependencies, and works on Mac, Linux and Windows with different acceleration hardware. It is a desktop application to run different Stable Diffusion solutions, keep them up to date, provide a model browser integrating with CivitAI and HuggingFace to download and share models with the different inference engines (download a model once and have it for use in Automatic1111, ComfyUI, Foocus, …). The tool also include in its available “Packages”, some training tools. We will not go into too much details on the tool use, but invite you to check the “Community Guides” available from https://lykos.ai/.
We will prefer to use it in “Portable Mode” where all the files are colocated with the tool’s executable; ie. we will create a directory for it and place the downloaded executable in that directory.
After downloading the tool, we start it. To use it, we need to agree to their license agreement. As discussed above, we select the “Portable Mode”, then are presented with the first-time setup UI, where we can select the inference engines to install. We will install at minimum ComfyUI.
In the “Settings → Accounts”, we will get access to means to identify ourselves with Lykos or CivitAI.
On the UI’s left side is the “Model Browser” which displays a list of CivitAI and HuggingFace available models. From the CivitAI tab, It is possible to see examples of model generated content, and using the three dots, see examples of prompts and values directly from CivitAI’s website. When selecting a model, we can see the different versions of the model and the size of the download. The “Model Description” dropdown will often have recommendations on how to get the best results with this model. It is possible to manually select the “Download location”, although, the tool will know where a download is best expected, such as Models/Stable Diffusion for “checkpoints”. After initiating a model download, it is possible to see its progress in the “Downloads” list.
The “Checkpoint Manager” presents a list of downloaded models, and right-clicking on one will provide the “Open in CivitAI” option to obtain example of use.
It is possible to use ComfyUI’s WebUI directly, but Stability Matrix has their own “Inference” tab that makes use of it, and have an integration with the models directory (the latest dev version also has a unet entry, but the current stable does not; more on this in the next section). When using this option, the tool will first need to launch ComfyUI to generate the image based on the setting set on the page. Once the inference engine is loaded, the “Generate” button will return an image.
The “Packages” tab will show “Stop”, “Restart”, “Console, and “WebUI” when the engine is started. The “Console” will allow us to see information about the process. By default, the engine will be started on port 8188. This can be changed using the gears icon with access to the “Launch Options” menu where the tool can be tweaked as needed, including the listening port.
Many options are available on the “Inference” tab, to add Lora or VAE for example, but also word completion in the prompt sections. We recommend testing the tool to get familiar with its UI.
Using FLUX.1[dev]
Both methods will make use of the prompt detailed on https://comfyanonymous.github.io/ComfyUI_examples/flux/. In particular, we invite you to read the notes about the use of the fp8 version of the file (flux1-dev-fp8.safetensors, over 17GB). A few files are needed to continue:
(optional) t5xxl_fp8_e4m3fn.safetensors (about 5GB), an fp8 version.
ComfyUI WebUI
This method works using the ComfyUI WebUI started from either Dockge or Stability Matrix (”Packages → ComfyUI → Launch” and using the “Open Web UI” button once the url is shown in the console).
We need to place the models in the expected locations:
for Dockge, the base directory is /opt/stacks/comfyui-nvidia/run/ComfyUI
while for Stability Matrix in “Portable Mode”, the Data folder present at the same location as the executable is the base. The VAE and CLIP files can be placed in the Data/Models shared directory, but (for the time being, the devs are working on this) the unet files should be placed directly into the ComfyUI installed package itself at Data/Packages/ComfyUI.
The files then go to:
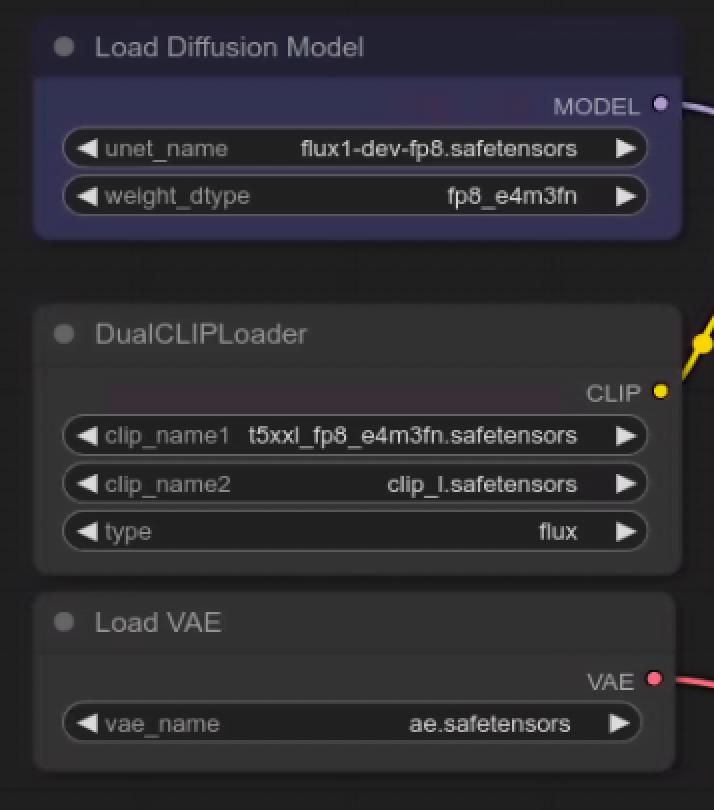
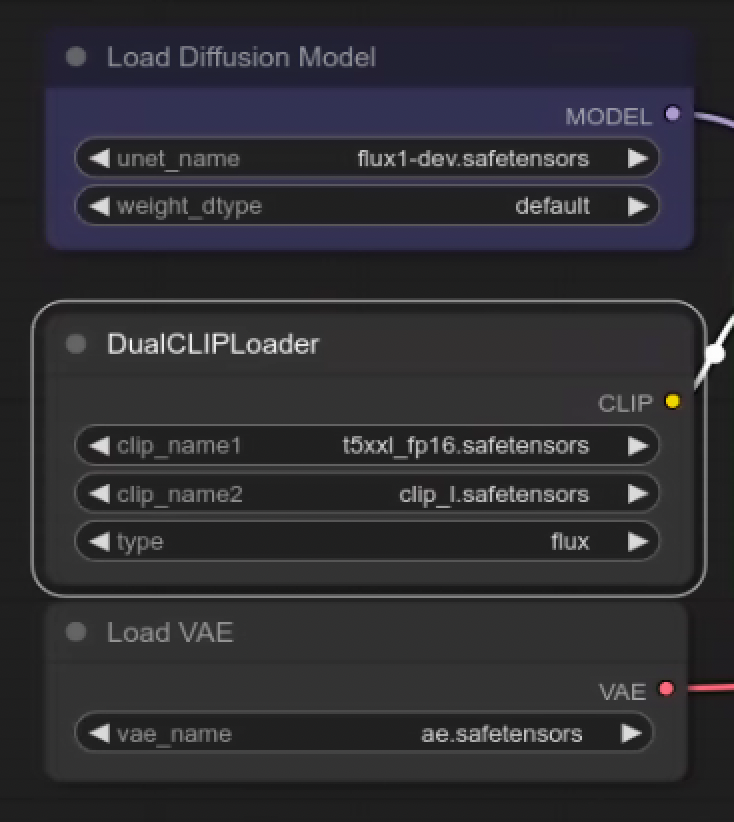
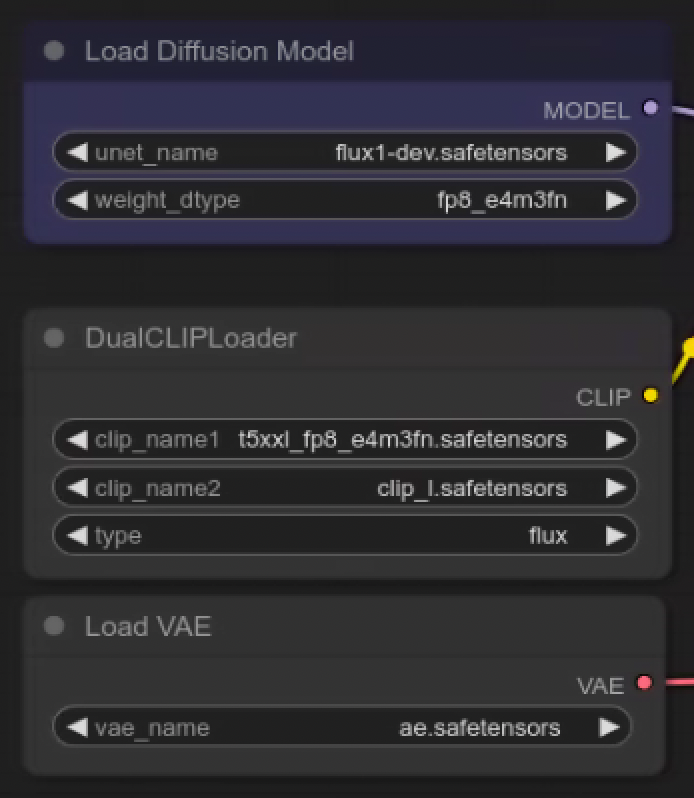
flux1-dev.safetensors, flux1-dev-fp8.safetensors (if obtained) go into the models/unet folder
ae.safetensors goes into the models/vae folder
t5xxl_fp16.safetensors, t5xxl_fp8_e4m3fn.safetensors (if obtained) and clip_l.safetensors go into the models/clip folder
After using “Refresh” on the ComfyUI, we can “Queue Prompt”.
Depending on the files you have obtained, you can try multiple combinations (click on an image for a larger version):
The speed and memory requirements will drop going from fp16 to fp8, with a small decrease in quality.
Stability Matrix’s Inference Tab
🦸
Many thanks to mohnjiles on Stability Matrix’s Discord for detailing how to use those settings.
Current release: 2.11.6
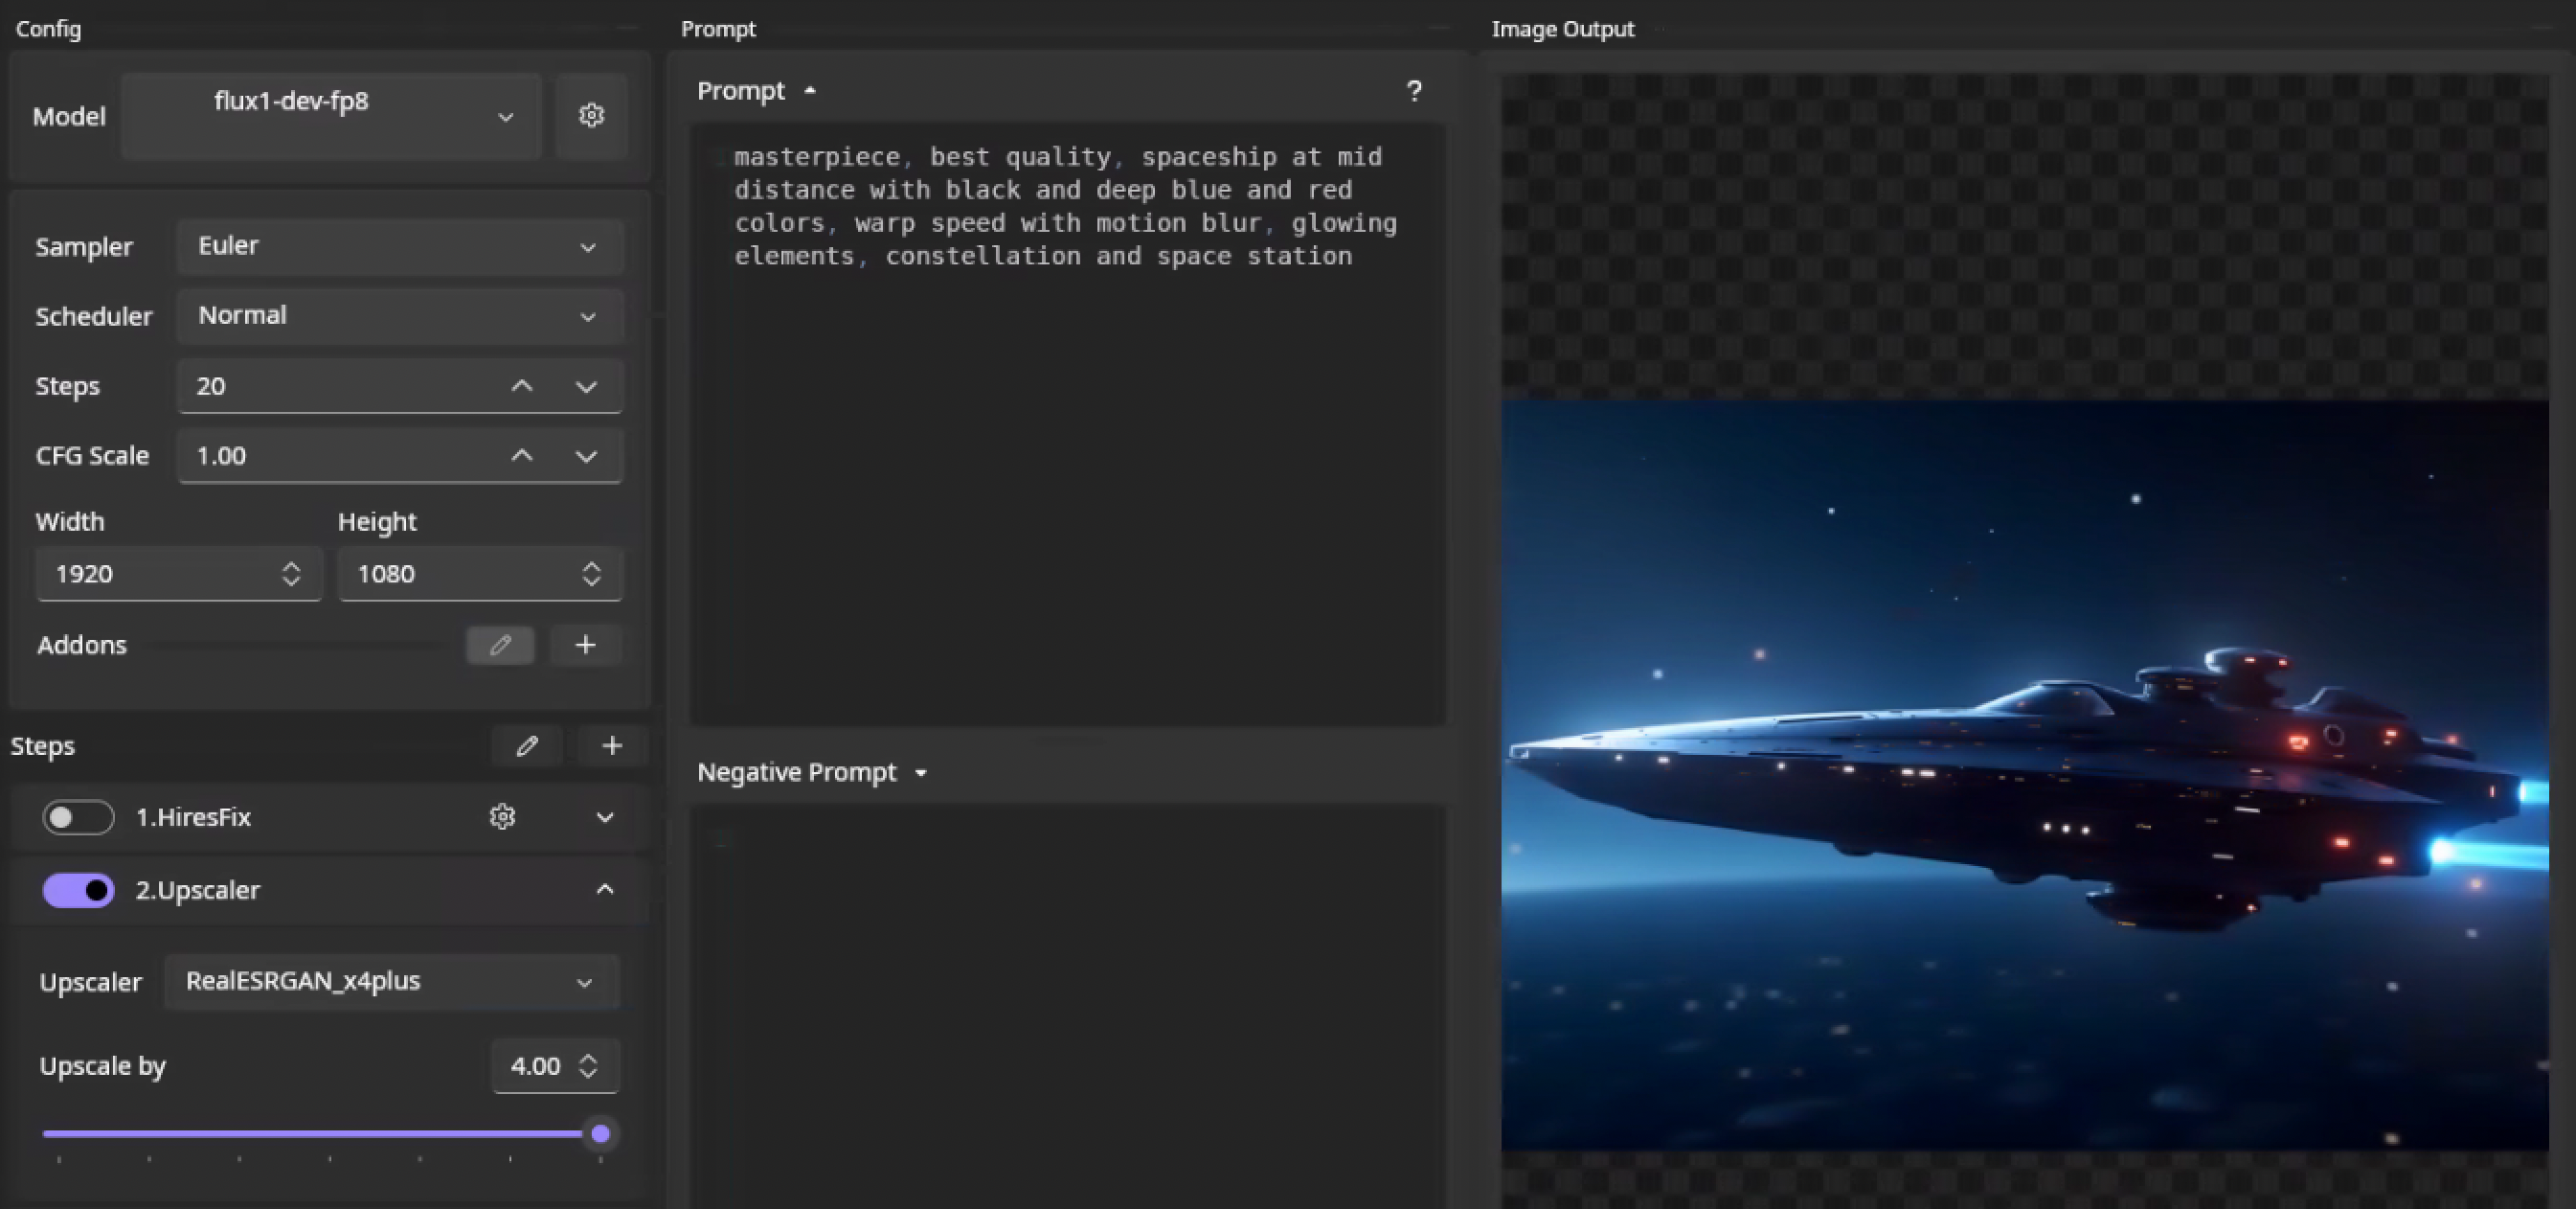
It is possible to use “Inference → Text to Image” to load the flux1-dev-fp8.safetensor file (placed in Models/StableDiffusion folder) and generate results directly from this release.
When using this model, it is recommended to:
keep the “CFG Scale” (classifier-free guidance scale) at 1.0
to not use negative prompts.
“Inference → Text to Image” example with settings (click to view larger version)
Dev release: 2.12.0-dev3
🚧
This feature is currently only available to supporters using the Development branch (”Settings → Updates”), and tested with 2.12.0-dev3.
In the inference tab, a new “Flux Text to Image” option is available. It can be configured with:
“Inference → Flux Text to Image” settings
With those settings loaded (or alternate depending on the weights downladed), it is possible to use the tool and generate content.
The following uses the https://github.com/ostris/ai-toolkit GitHub repository to train a local LoRA on user-provided images. We will then create images using the generated LoRA with ComfyUI.
Running this tool requires an Nvidia GPU with 24GB of VRAM.
We will train on Ubuntu 24.04 with a recent Nvidia driver installed, git, brew (to install useful commands), and Python (python3 with pip3 and the venv package installed, either via apt or brew)
Linux host set-up instructions for Dockge, a self-hosted Docker Compose stacks management tool with a feature-rich interface for self-hosting and home lab setups. It provides access to an all-in-one view of logs, a YAML editor, a web terminal, container controls, and monitoring.

![FLUX.1[dev] with ComfyUI and Stability Matrix (20240824)](https://imagedelivery.net/IEMzXmjRvW0g933AN5ejrA/wwwnotionso-image-prod-files-secures3us-west-2amazonawscom-ed175516-6d97-436e-aa46-cdf22facffbd-aa5c4a72-2145-4e6e-977c-ecabdeee3fc4-20240810-flux1devjpg/public)