The following uses the https://github.com/ostris/ai-toolkit GitHub repository to train a local LoRA on user-provided images. We will then create images using the generated LoRA with ComfyUI.
Running this tool requires an Nvidia GPU with 24GB of VRAM.
We will train on Ubuntu 24.04 with a recent Nvidia driver installed, git, brew (to install useful commands), and Python (python3 with pip3 and the venv package installed, either via apt or brew)
Training a LoRA for flux.1-dev and flux.1-schnell on a 24GB GPU and image generation using ComfyUI
Revision: 20250126-0 (init: 20240818)
The following uses the https://github.com/ostris/ai-toolkit GitHub repository to train a local LoRA on user-provided images, which we can use to generate pictures using ComfyUI.
Running this training requires an Nvidia GPU with 24GB of Video RAM (VRAM).
We will train on Ubuntu 24.04 with a recent Nvidia driver installed, git, brew (to install useful commands), and Python (python3 with pip3 and the venv package installed, either via apt or brew)
Recent developments in the Flux model ecosystem include advancements in FP8 and NP4 quantization formats and enhancements in using LoRA. Earlier this week, source code to enable the training of a Flux LoRA on user-provided images was announced: https://github.com/ostris/ai-toolkit
We will use it to create a LoRA for Flux.1-Dev and Flux.1-Schnell. We will then exercise the trained LoRA with ComfyUI (workflows embedded in the generated images) to train the models.
Requirements:
An Nvidia GPU with at least 24GB of Video RAM
Using Flux.1-Dev, requires acceptance of the terms of use.
In the following, we will train on the tok prompt trigger word and incorporate it into our files and directory names.
We will train our LoRA to 4000 steps (you are not required to go this far; good results can be obtained at lower settings, such as 2000). From a previous test, this takes over 4 hours on an NVIDIA RTX 3090 and about 2h20 on an RTX 4090.
During training, if the Linux system has a Windows Manager running, a web browser, or any service (on Dockge, for example, Ollama or others) that uses the GPU, it is required to terminate as many of those as possible. Use nvidia-smi to check what uses the GPU’s memory and reduce the VRAM consumption before training. Most of the following steps can be done over ssh in a tmux terminal (training can take a few hours; being able to re-attach to a session will be helpful) and in a Visual Studio Code Remote connection.
During a test run on an Ubuntu Desktop system accessed remotely, only two processes (Xorg and gnome-shell) were present, and nvidia-smi only listed 141MB of our 24GB VRAM GPU).
Preliminary steps
Code retrieval and virtualenv creation
⚠️
If you use brew, your system might have Python 3.13 as your default. However, it is not compatible (yet) with PyTorch and other requirements, so we will be using python3.12 directly for some of the following commands.
Obtain the source code, create a virtual environment, and install the requirements.txt.
We will use a base directory called Flux_Lora in the home (~) of our user account, where we will place the required components.
mkdir ~/Flux_Lora
cd ~/Flux_Lora

# Obtain the source and the code's submodules
git clone https://github.com/ostris/ai-toolkit.git
cd ai-toolkit
git submodule update --init --recursive

# Create and enable a python virtual environment to place all the needed packages
python3.12 -m venv venv
source venv/bin/activate
# for future use, re-enabling the venv can be done by running the source command again

# Confirm python3 and pip3 are from our venv
which python3
which pip3

# Install the required packages
pip3 install torch
pip3 install -r requirements.txt
pip3 install mediapipe peft
# mediapipe appears to be needed for Dev, while peft will be needed for Schnell
Hugging Face token
Downloading content from HuggingFace.co (HB) requires a read token. Content from HF will be placed within the value of the HF_HOME environment variable, which by default is ~/.cache/huggingface. This environment variable can be altered to match your preferences; see https://huggingface.co/docs/huggingface_hub/en/package_reference/environment_variables#hfhome for details. We will use the default to maximize caching opportunities.
# Install the CLI using brew
brew install huggingface-cli

# Confirm the token is valid and add it to the default HF_HOME at ~/.cache/huggingface
huggingface-cli login
# Answer no to "Add token as git credential" as this is a "download-only" token
# This will store the token in ~/.cache/huggingface/token
# All models retrieved from HF's hub will end up in ~/.cache/huggingface/hub
FLUX.1-dev is hosted on HF, with the note, “This repository is publicly accessible, but you have to accept the conditions to access its files and content.” If you intend to use this model for training, follow the steps detailed on https://huggingface.co/black-forest-labs/FLUX.1-dev to accept the terms. If the terms are not accepted, the model will not be accessible.
The HF token's availability will prove useful for miscellaneous downloads of side files from HF as they might occur.
Dataset preparation
Prepare a folder for a set of image files:
mkdir ~/Flux_Lora/training_images-tok
When using this folder during training, the tool will create a _latent_cache folder to store .safetensors characterizing the images upon which to train.
Place your images in this location; the recommended image size is 1024x1024. The script requires them to be in .jpg or .png format. During its preliminary steps, the tool will resize them for processing size, with a maximum per-side pixel size of 512, 768, and 1024.
When training on a person, it is recommended to:
Have at least 12 face photographs
Each photograph should have altering conditions so the model training can differentiate the person from the background or its clothing. As such, use shots with altering angles of the face, lighting conditions, background, clothes, and ornaments (limit the ones hiding your hair, but if wearing glass, take images with and without those).
The script requests that you name each file image[number].[extension] increasing number as needed: image1.jpg, image2.png … image25.jpg
Each image file must have a corresponding .txt file with a description of the image. Because the developer allowed for text replacement using the [trigger] keyword, each file can contain the same value. For example, ours contains a photo of a [trigger] man. The content can be extended to be more descriptive, but this is sufficient to train the LoRA.
Each image must have a matching .txt file: image1.jpg with image1.txt … image25.jpg and image25.txt
LoRA Training
Flux.1-Dev
The training step requires the adaptation of a configuration file. For flux.1-dev, an example configuration file is in ~/Flux_Lora/ai-toolkit/config/examples/train_lora_flux_24gb.yaml
cd  ~/Flux_Lora/ai-toolkit
# create an output directory for the trained LoRA(s)
mkdir ../trained_LoRA
# copy the example training yaml and rename it
cp config/examples/train_lora_flux_24gb.yaml config/flux_dev-tok.yaml
Edit ~/Flux_Lora/ai-toolkit/config/flux_dev-tok.yaml with your preferred editor (we will use VSCode with remote SSH into the system to limit the use of additional VRAM). The configuration file supports relative paths (../../directory but not the ~ character—representing the user’s home directory), so we will specify folders relative to the ai-toolkit directory in our configuration file.
The comments in the YAML file inform us of the expected use case for each entry in the configuration file. As such, here are the limited changes we made:
In config, we modified the name: "flux_dev-tok" to reflect that we are creating a Flux.1-Dev LoRA for a tok prompt trigger word.
We are modifying training_folder: "../trained_LoRA" to use our created directory. The script will create a flux_dev-tok folder (it uses the value of name) to store the training and samples.
Uncomment and set the trigger_word to a value you will use in your prompts. p3r5on or tok are commonly used values. The image generation text prompts will recognize this value. Using different values for different persons (it is recommended to always use a single non-existing word). Here we will use trigger_word: "tok” . This trigger word will be replaced inside the imageNUM.txt automatically and in the sampleprompts section.
The save section specifies how often the training saves .safetensors checkpoints. Each is usable, so if you decide a specific checkpoint gives better results (based on the samples generated), you can use that file instead of the final one. It is recommended that the sample_every generation match the save_every value.
In the datasets section we adapt the folder_path to where our training images are located: folder_path: "../training_images-tok"
In the train section, we increased the number of steps to 4000.
The tool will generate checkpoints at save_every steps. If the samples deteriorate as training steps increase, we can select an earlier checkpoint file instead of the later one(s).
We are not altering the model section.
If already present in the HF cache, the file will not be re-downloaded.
You must have agreed to the terms for the FLUX.1-Dev model for it to be accessible.
In the sample section, we keep the sample_every to match the save_every value. We can comment out (#) some prompts while adding [trigger] to some. The idea is to see how good the model is at training the LoRA on the images we provided, not to demonstrate the capabilities of FLUX.1-dev. For example:
        prompts:
          # you can add [trigger] to the prompts here and it will be replaced with the trigger word
          - "a woman holding a sign that says, 'this is a sign'"
          - "a [trigger] man holding a sign that says 'AI is fun'"
          - "a [trigger] man as a Jedi warrior, deep blue lightsaber, dark purple background with some multicolor neon light reflecting"
          - "a [trigger] man as a green lantern, cosmic background, creating a dragon from his ring, majestic, rule of third"
          - "a [trigger] man as Conan the barbarian, snow-covered fields, sword in hand, defiant, dynamic pose, golden ratio, asymmetric composition, photorealism, cinematic realism"
          - "a portrait of a [trigger] man as Superman flying in space, yellow sun in the background, majestic, comic style"
          - "a [trigger] man as a cyberpunk warrior, anime style"
          - "professional photograph portrait of a [trigger] man, black and white"
          - "a [trigger] man wearing sunglasses riding a high-speed motorbike, hyper-maximalist, octane render"
          - "a [trigger] man, lucid dream-like 3d model, game asset, blender, unreal engine, rule of thirds, wide angle shot, looking off in distance style, glowing background, vivid neon wonderland, particles, blue, green, orange"
Here, only our first prompt will be consistent from sample generation to sample generation (the seed is set and not random). All the other generations will show us the model's improvements at generating a [trigger] man. We have a total of 10 prompts.
For reference, the entire configuration file is available at flux_dev-tok.yaml
The next step consists of starting and waiting for the training to complete. In a terminal on our tmux:
# Make sure you are running the create virtual env
# if needed: cd ~/Flux_Lora/ai-toolkit; source venv/bin/activate
time python3 ./run.py config/flux_dev-tok.yaml
The tool will validate the yaml file, download required models (over 30GB), generate latent content from the training images, and start training.
To see CPU and GPU usage, we can use nvitop (usable from pipx, itself installable using brew install pipx). In a new tmux terminal: pipx run nvitop
During training, it is possible to see the sample image being generated at each sample_every step. Those will be in ~/Flux_Lora/trained_LoRA/flux_dev-tok/samples with file names such as 1723999194004__000000000_0.jpg decomposed as “unix timestamp __ steps performed _ prompt number”. Being “step 0” this image is one of the initial “before training” samples, and being “prompt 0”, it is the one that we expect to be consistent from generation to generation (a woman holding a coffee cup […])
For each save_every step, a new .safetensors file is stored in the output directory. This is a usable LoRA. For example, at step 250, we get flux_dev-tok_000000250.safetensors. Based on the samples generated, we can cancel training early if a given save provides better results than another.
On a 4090, this training took 2h20 on 25 input images during an Aug 2024 run and only 1h50 on a similar set of input images in January 2025.
The final weight is located at ~/Flux_Lora/trained_LoRA/flux_dev-tok/flux_dev-tok.safetensors and is under 200MB.
Flux.1-Schnell
We will follow the steps above to train on the Apache-licensed Schnell model.
cd  ~/Flux_Lora/ai-toolkit
# create an output directory for the trained LoRA(s) if it does not already exist
mkdir ../trained_LoRA
cp config/examples/train_lora_flux_schnell_24gb.yaml config/flux_schnell-tok.yaml
Compared to the “dev” training configuration, the only change from the previous guide is that we have adapted the name: "flux_schnell-tok" to reflect the “schnell” model.
The other modifications we did stayed the same. We keep
training_folder: "../trained_LoRA"
trigger_word: "tok”
folder_path: "../training_images-tok"
steps: 4000
We also keep our altered prompts
The yaml file in the model section has been changed to reflect the use of Schell and the need for an assistant_lora to support this training.
For reference, the used schnell configuration file is available at flux_schnell-tok.yaml
After saving the file, we can then run the training:
# Make sure you are using the created virtualenv
# if needed: ~/Flux_Lora/ai-toolkit; source venv/bin/activate

# Run the training
time python3 ./run.py config/flux_schnell-tok.yaml
On a 4090, this training took the same 2h20 on 25 input images as it took for Dev in an August 2024 run and a little over two hours in January 2025.
The final weight is located at ~/Flux_Lora/trained_LoRA/flux_schnell-tok/flux_schnell-tok.safetensors and is under 200MB.
The following workflow requires custom_nodes to be installed; we recommend installing ComfyUI Manager in your ComfyUI to simplify the task of adding the custom node to your installation. If you use the docker container listed in "FLUX.1dev with ComfyUI and Stability Matrix” the tool is installed during the first run of the https://github.com/mmartial/ComfyUI-Nvidia-Docker container If you use the Desktop version of ComfyUI, the tool is also installed there. If you use an alternate ComfyUI installation, please see the installation details of ComfyUI manager at https://github.com/ltdrdata/ComfyUI-Manager for details on how to install it in your setup.
With the ComfyUI Manager node installed, we will have additional functions to our ComfyUI.
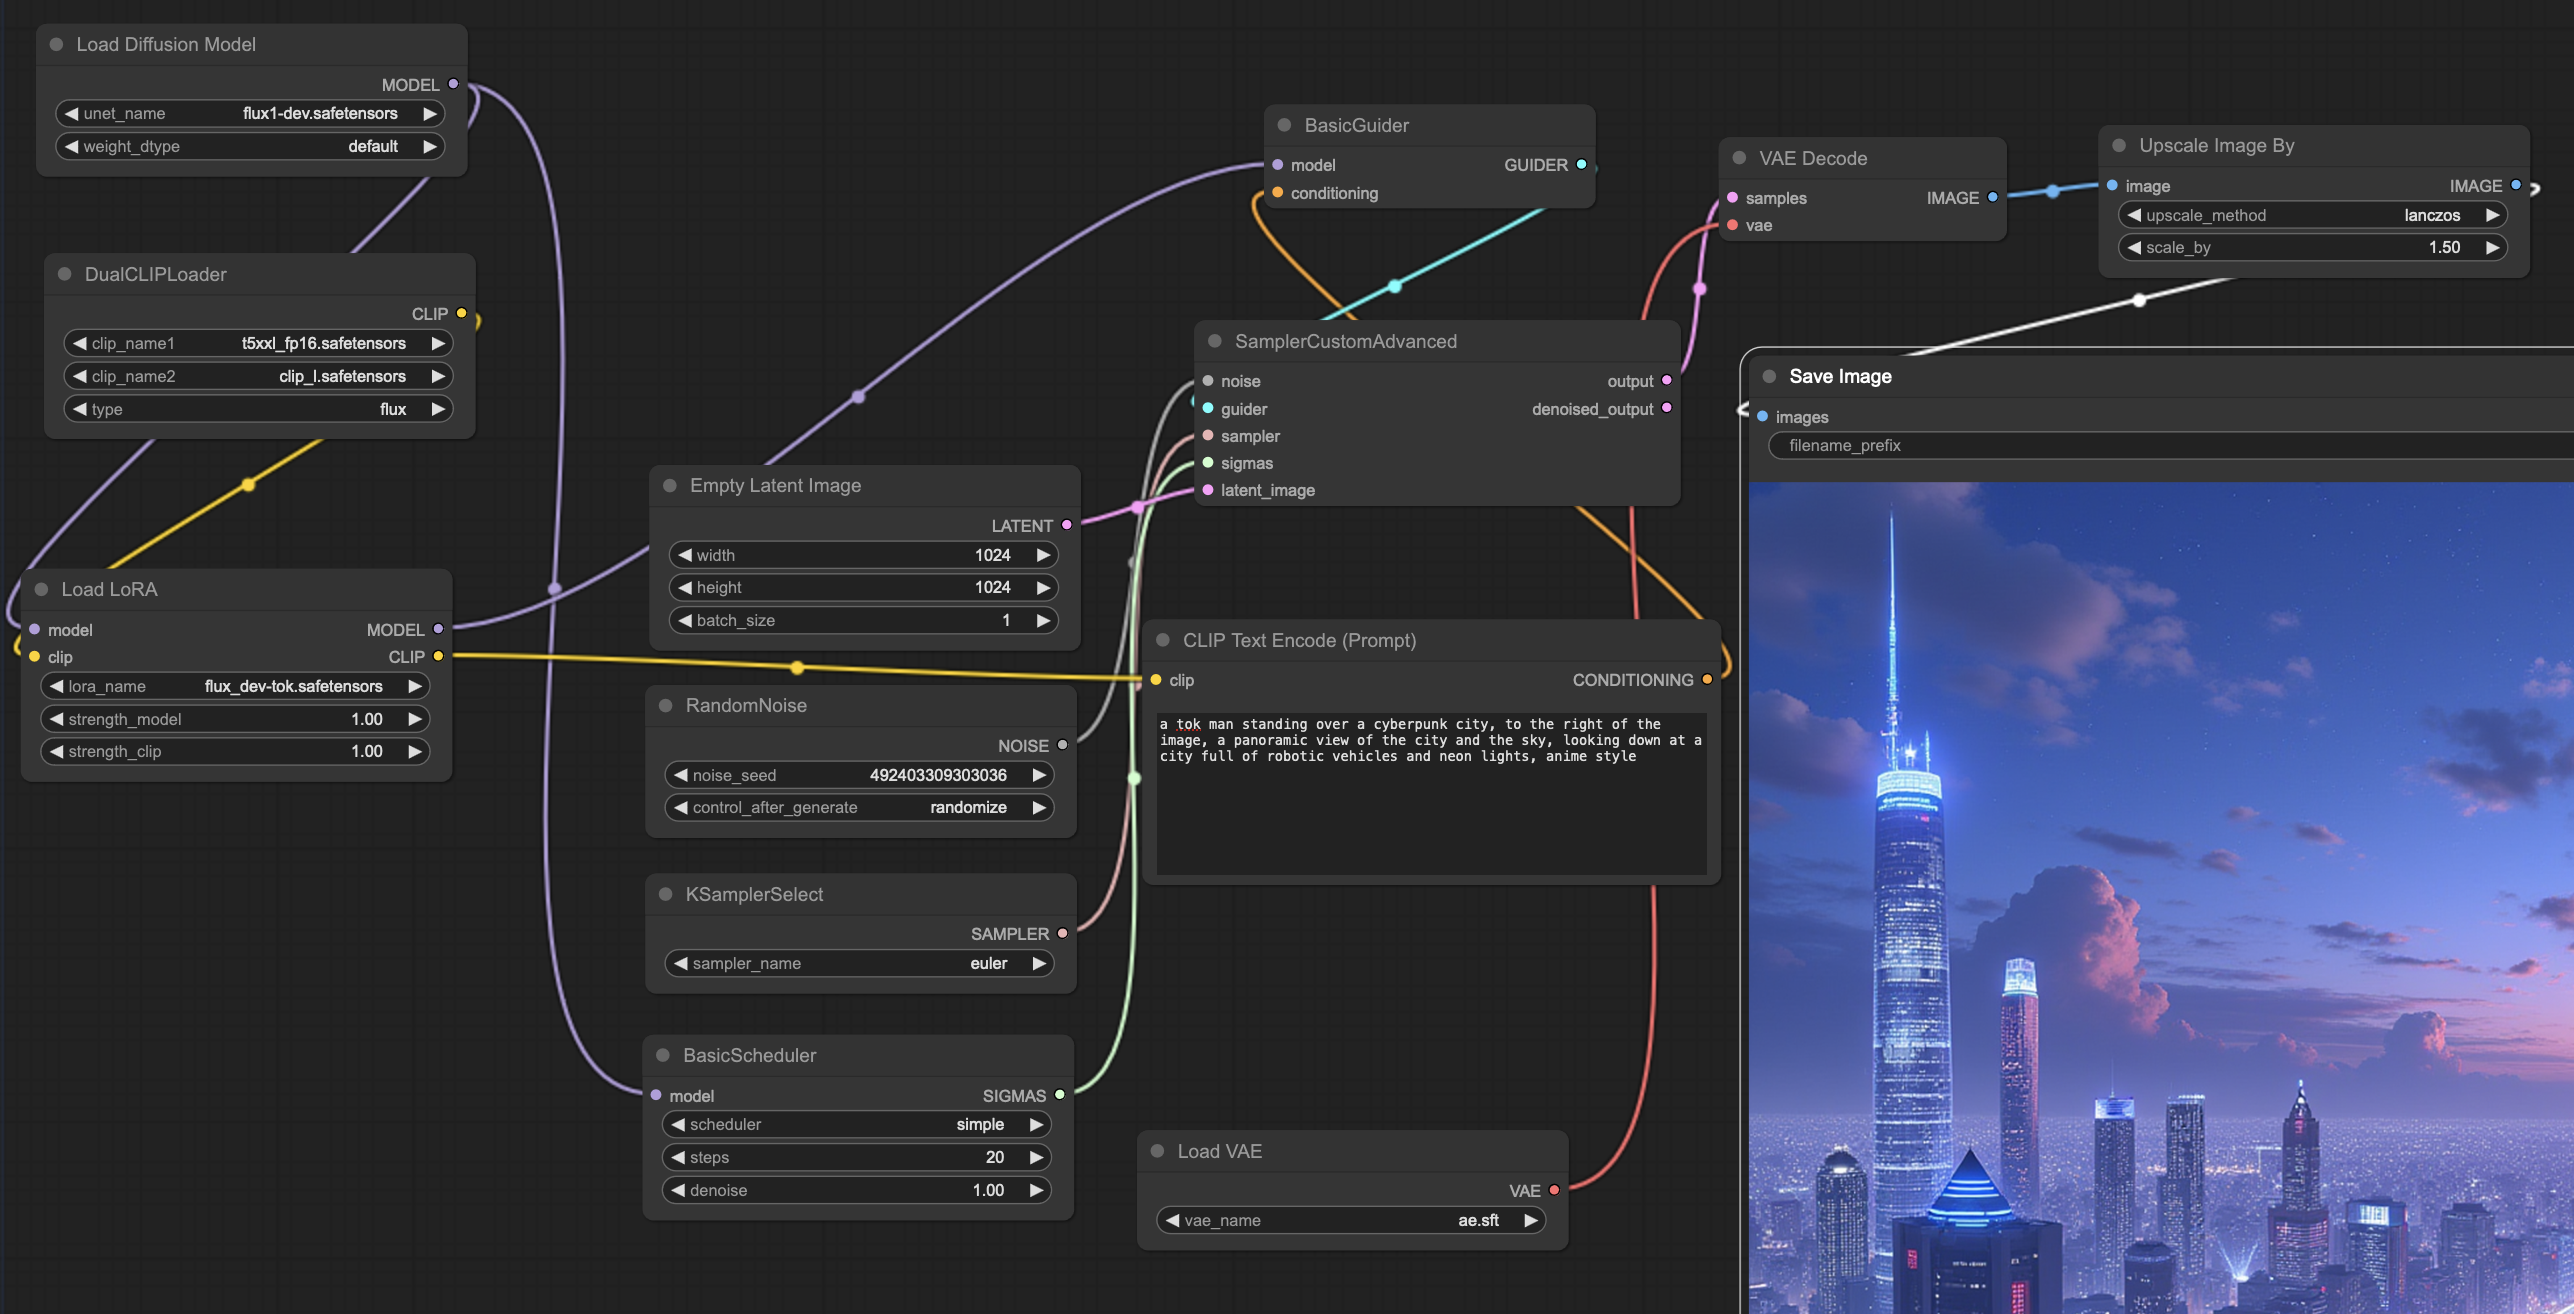
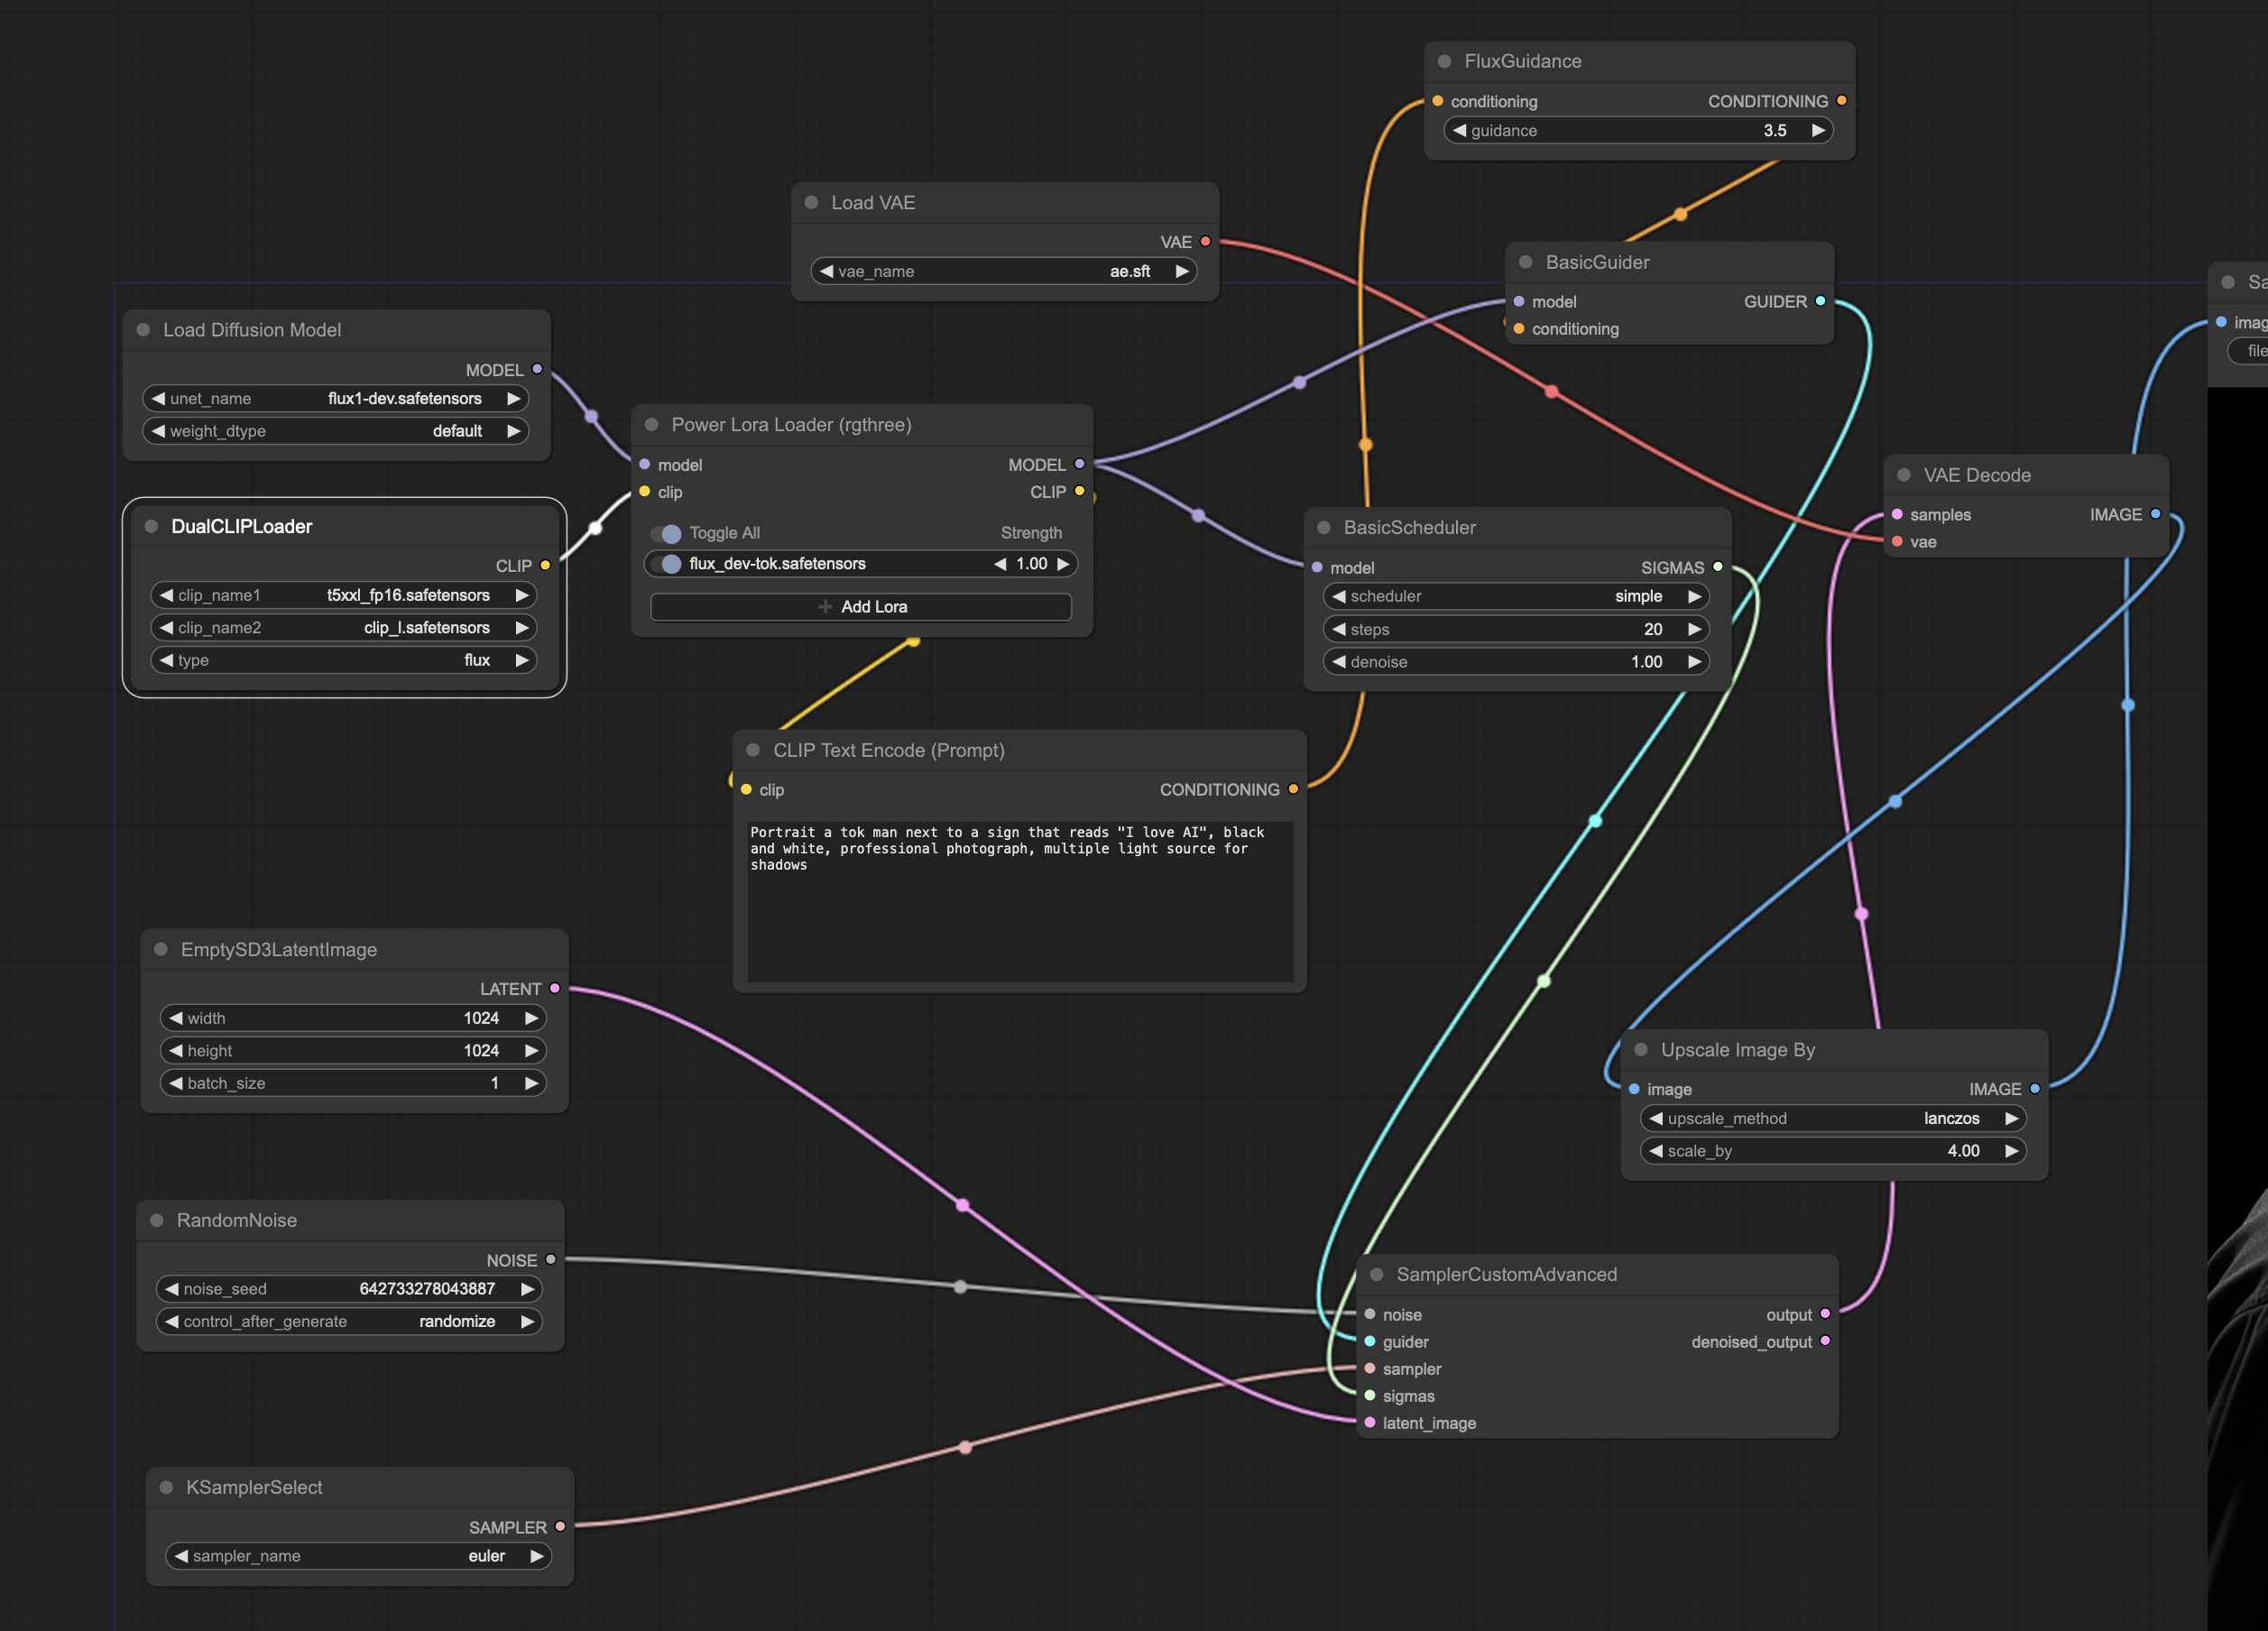
The workflow in question looks as follows:
Extended workflow with additional custom node (click on image for larger version)
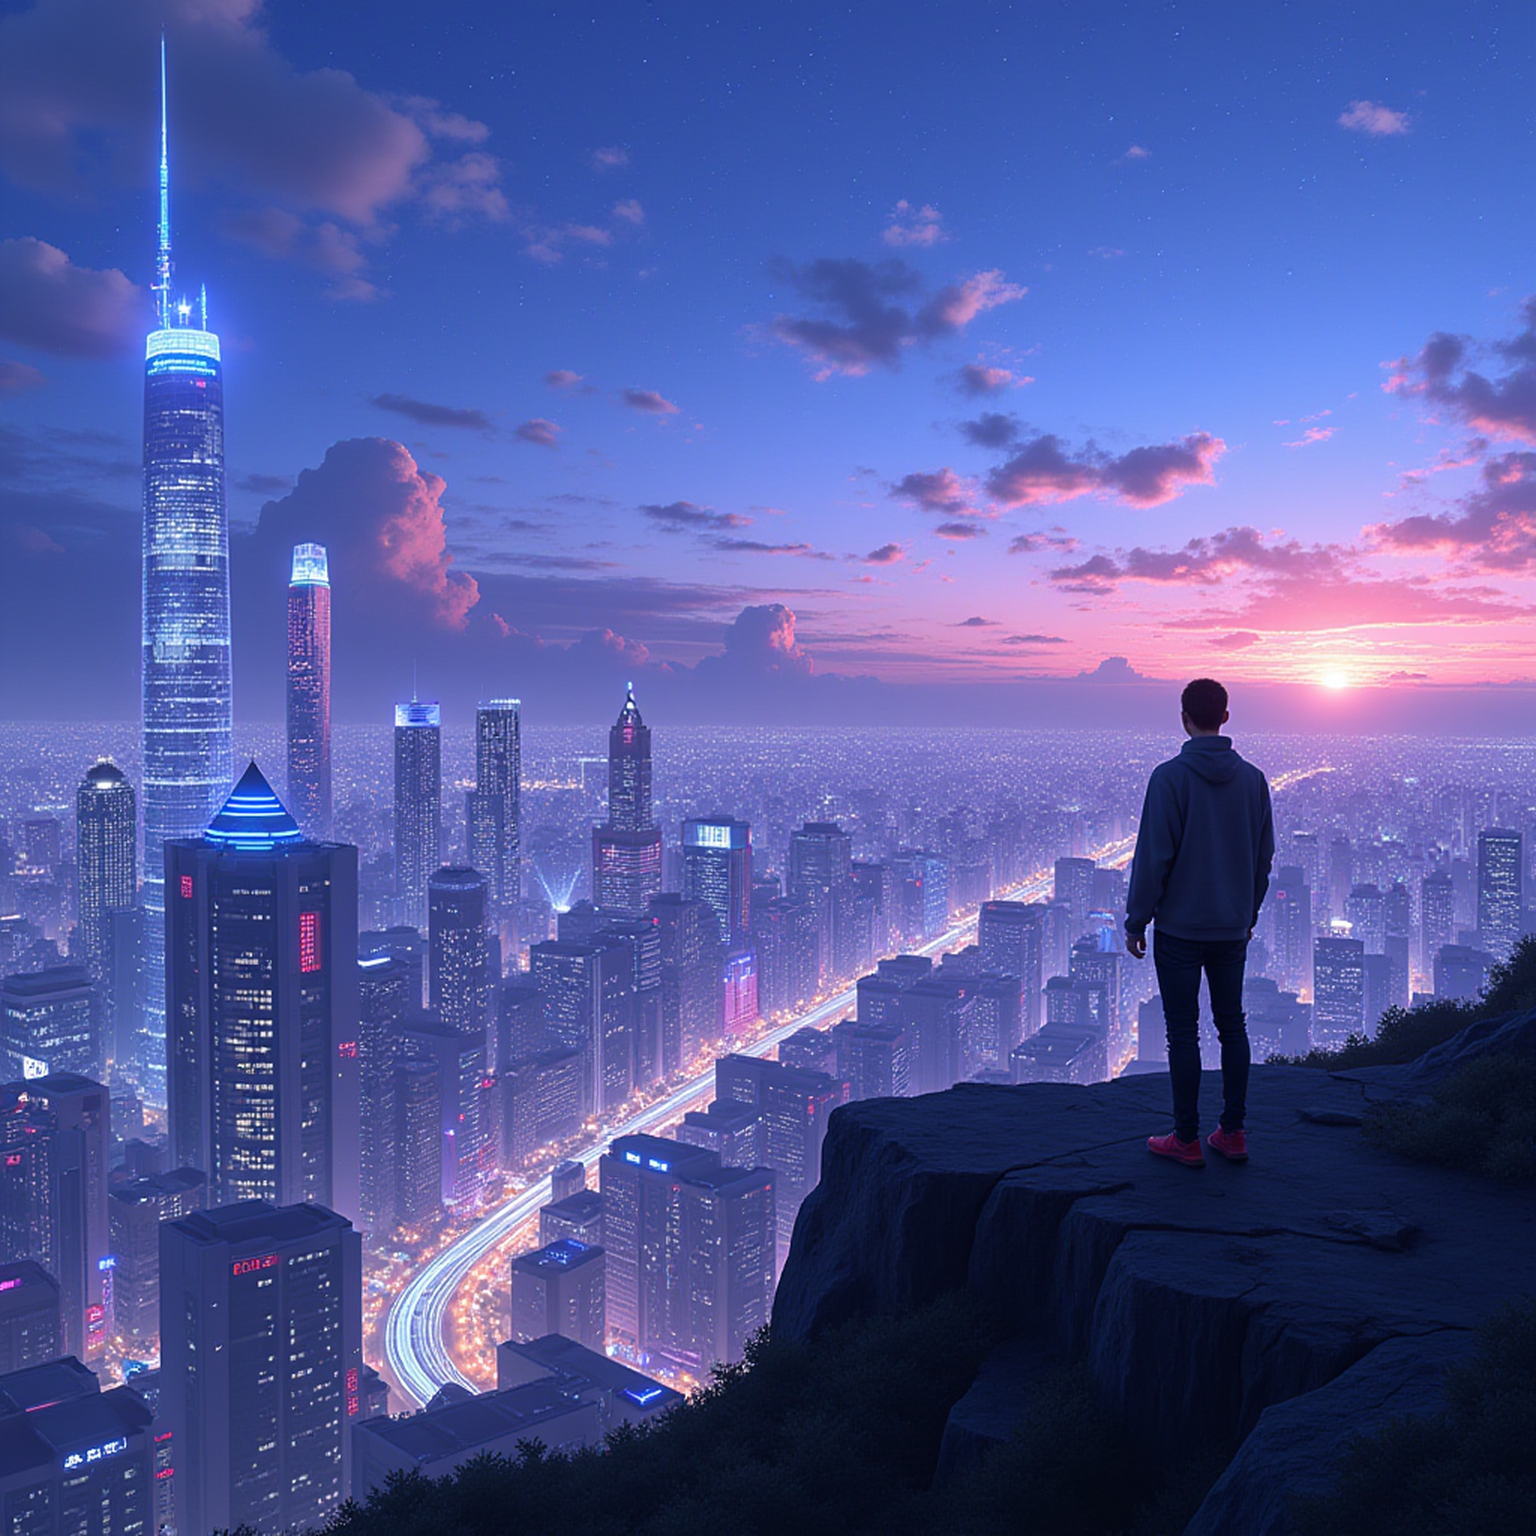
An image generated using this workflow (which is embedded in this image):
Image with embedded workflow (click on image to see the original to download)
With the image on your system and the ComfUI (with ComfyUI Manager installed), drag and drop the image onto the ComfUI canvas.
After dropping the image, we will be shown a notice about a missing custom node:
Selecting the Manager (older WebUI)
Will show the “ComfyUI Manager Menu”
Selecting the “Install Missing Custom Nodes” will allow us to “Install” the missing node.
After installation and a “Reload” (from the same menu where the “Manager” was, a browser page reload might be required as well), we should now be able to “Queue Prompt” and see the results of this extended workflow.
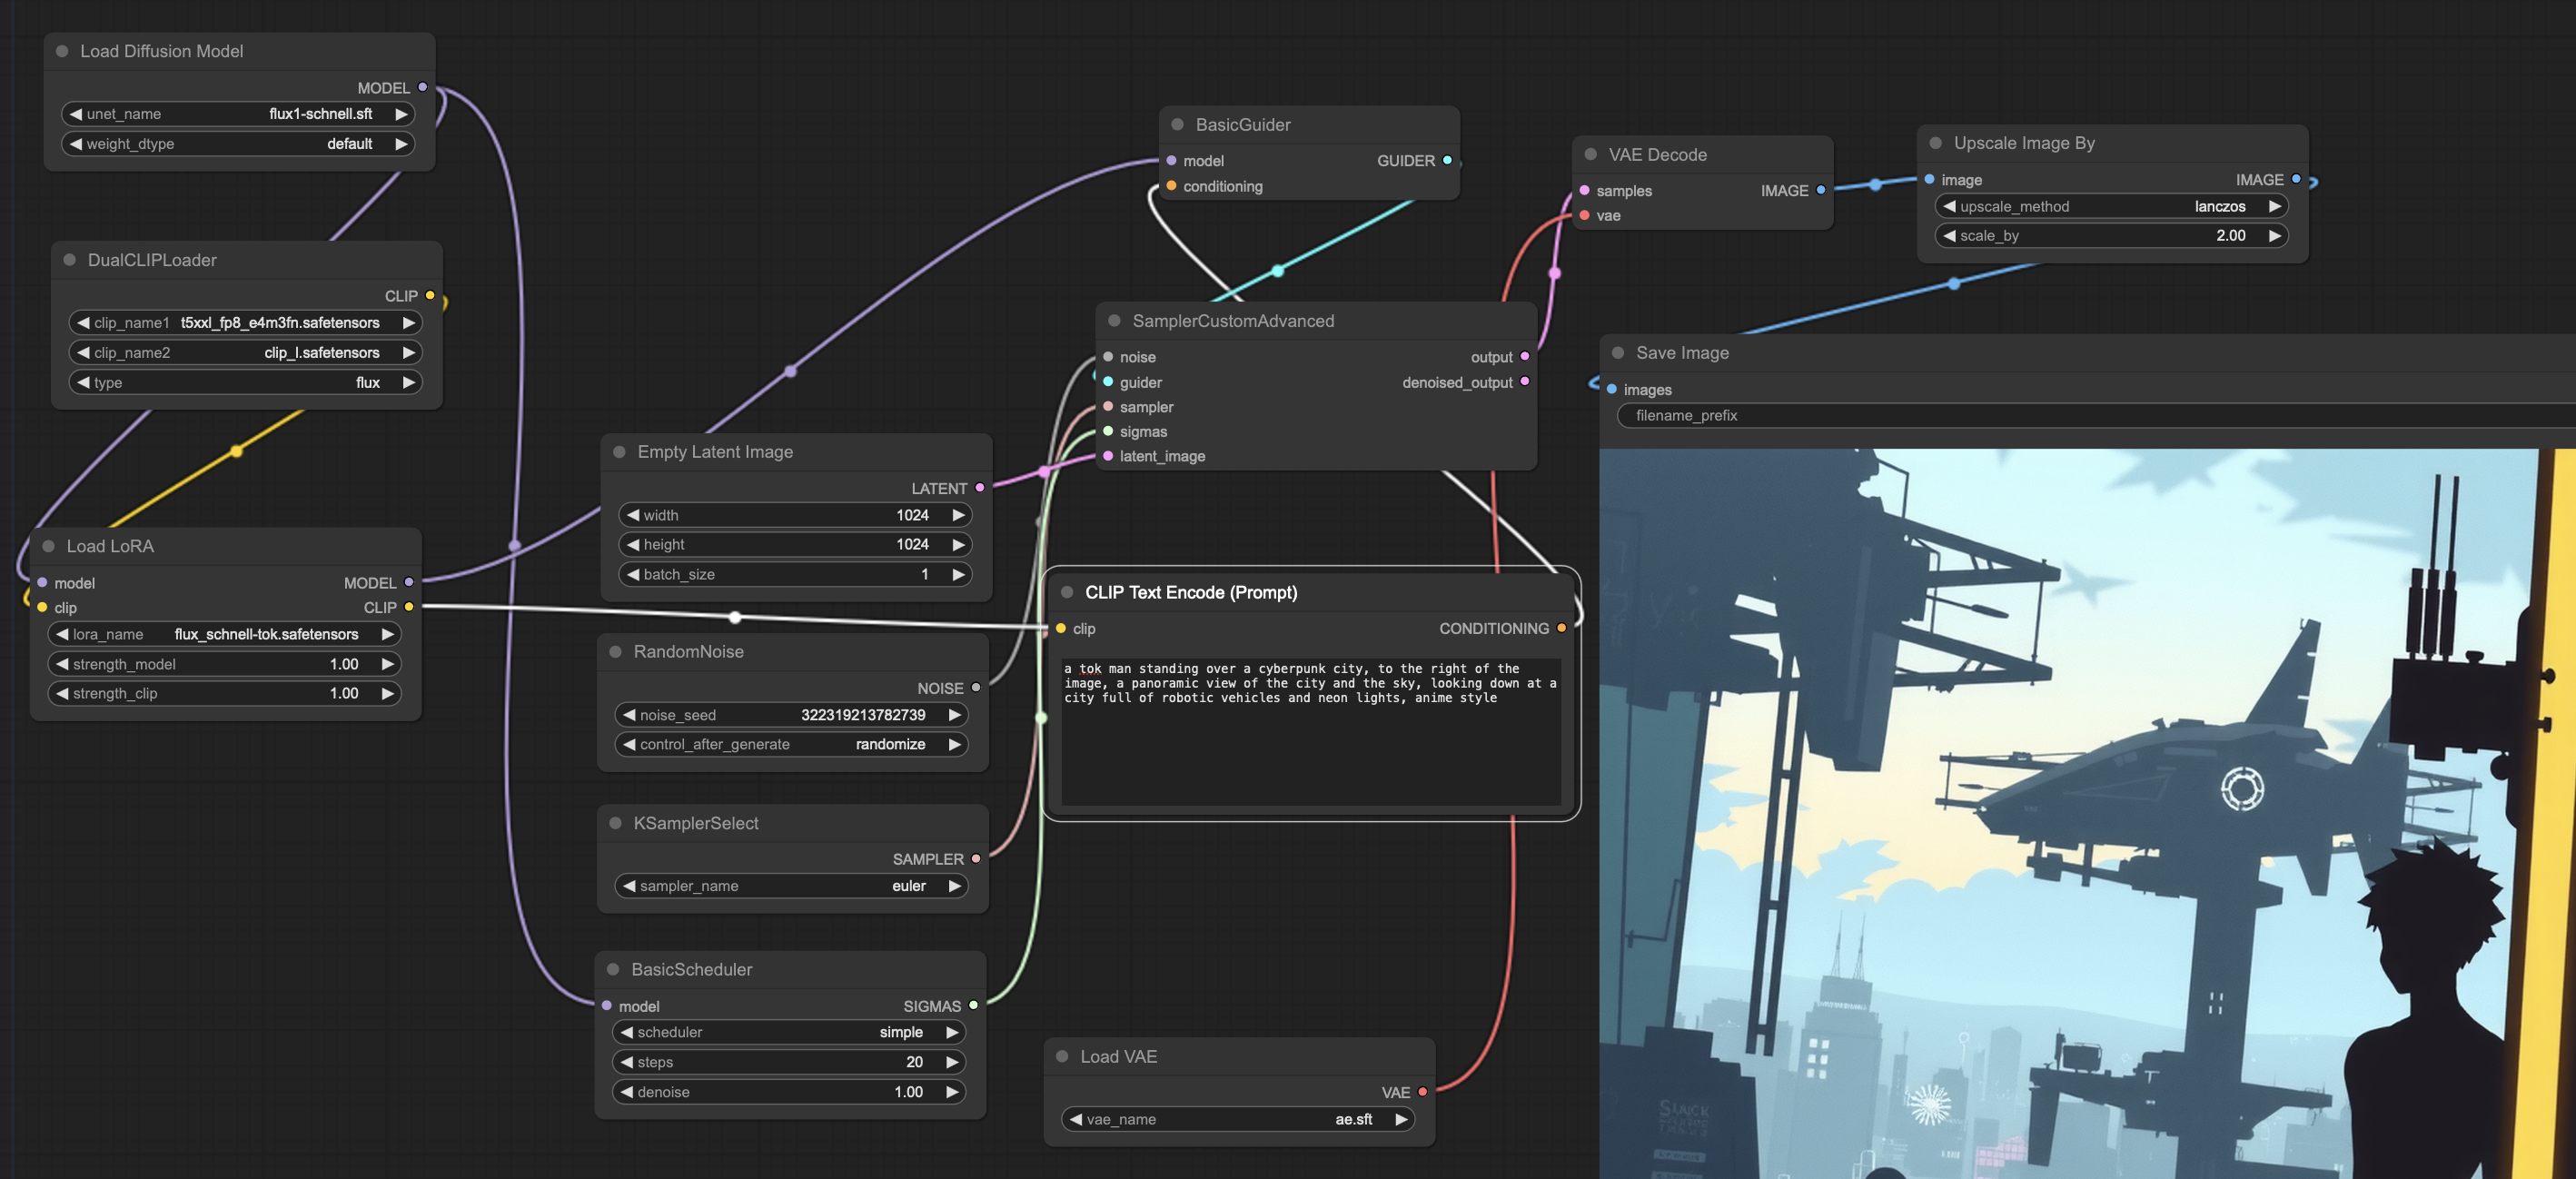
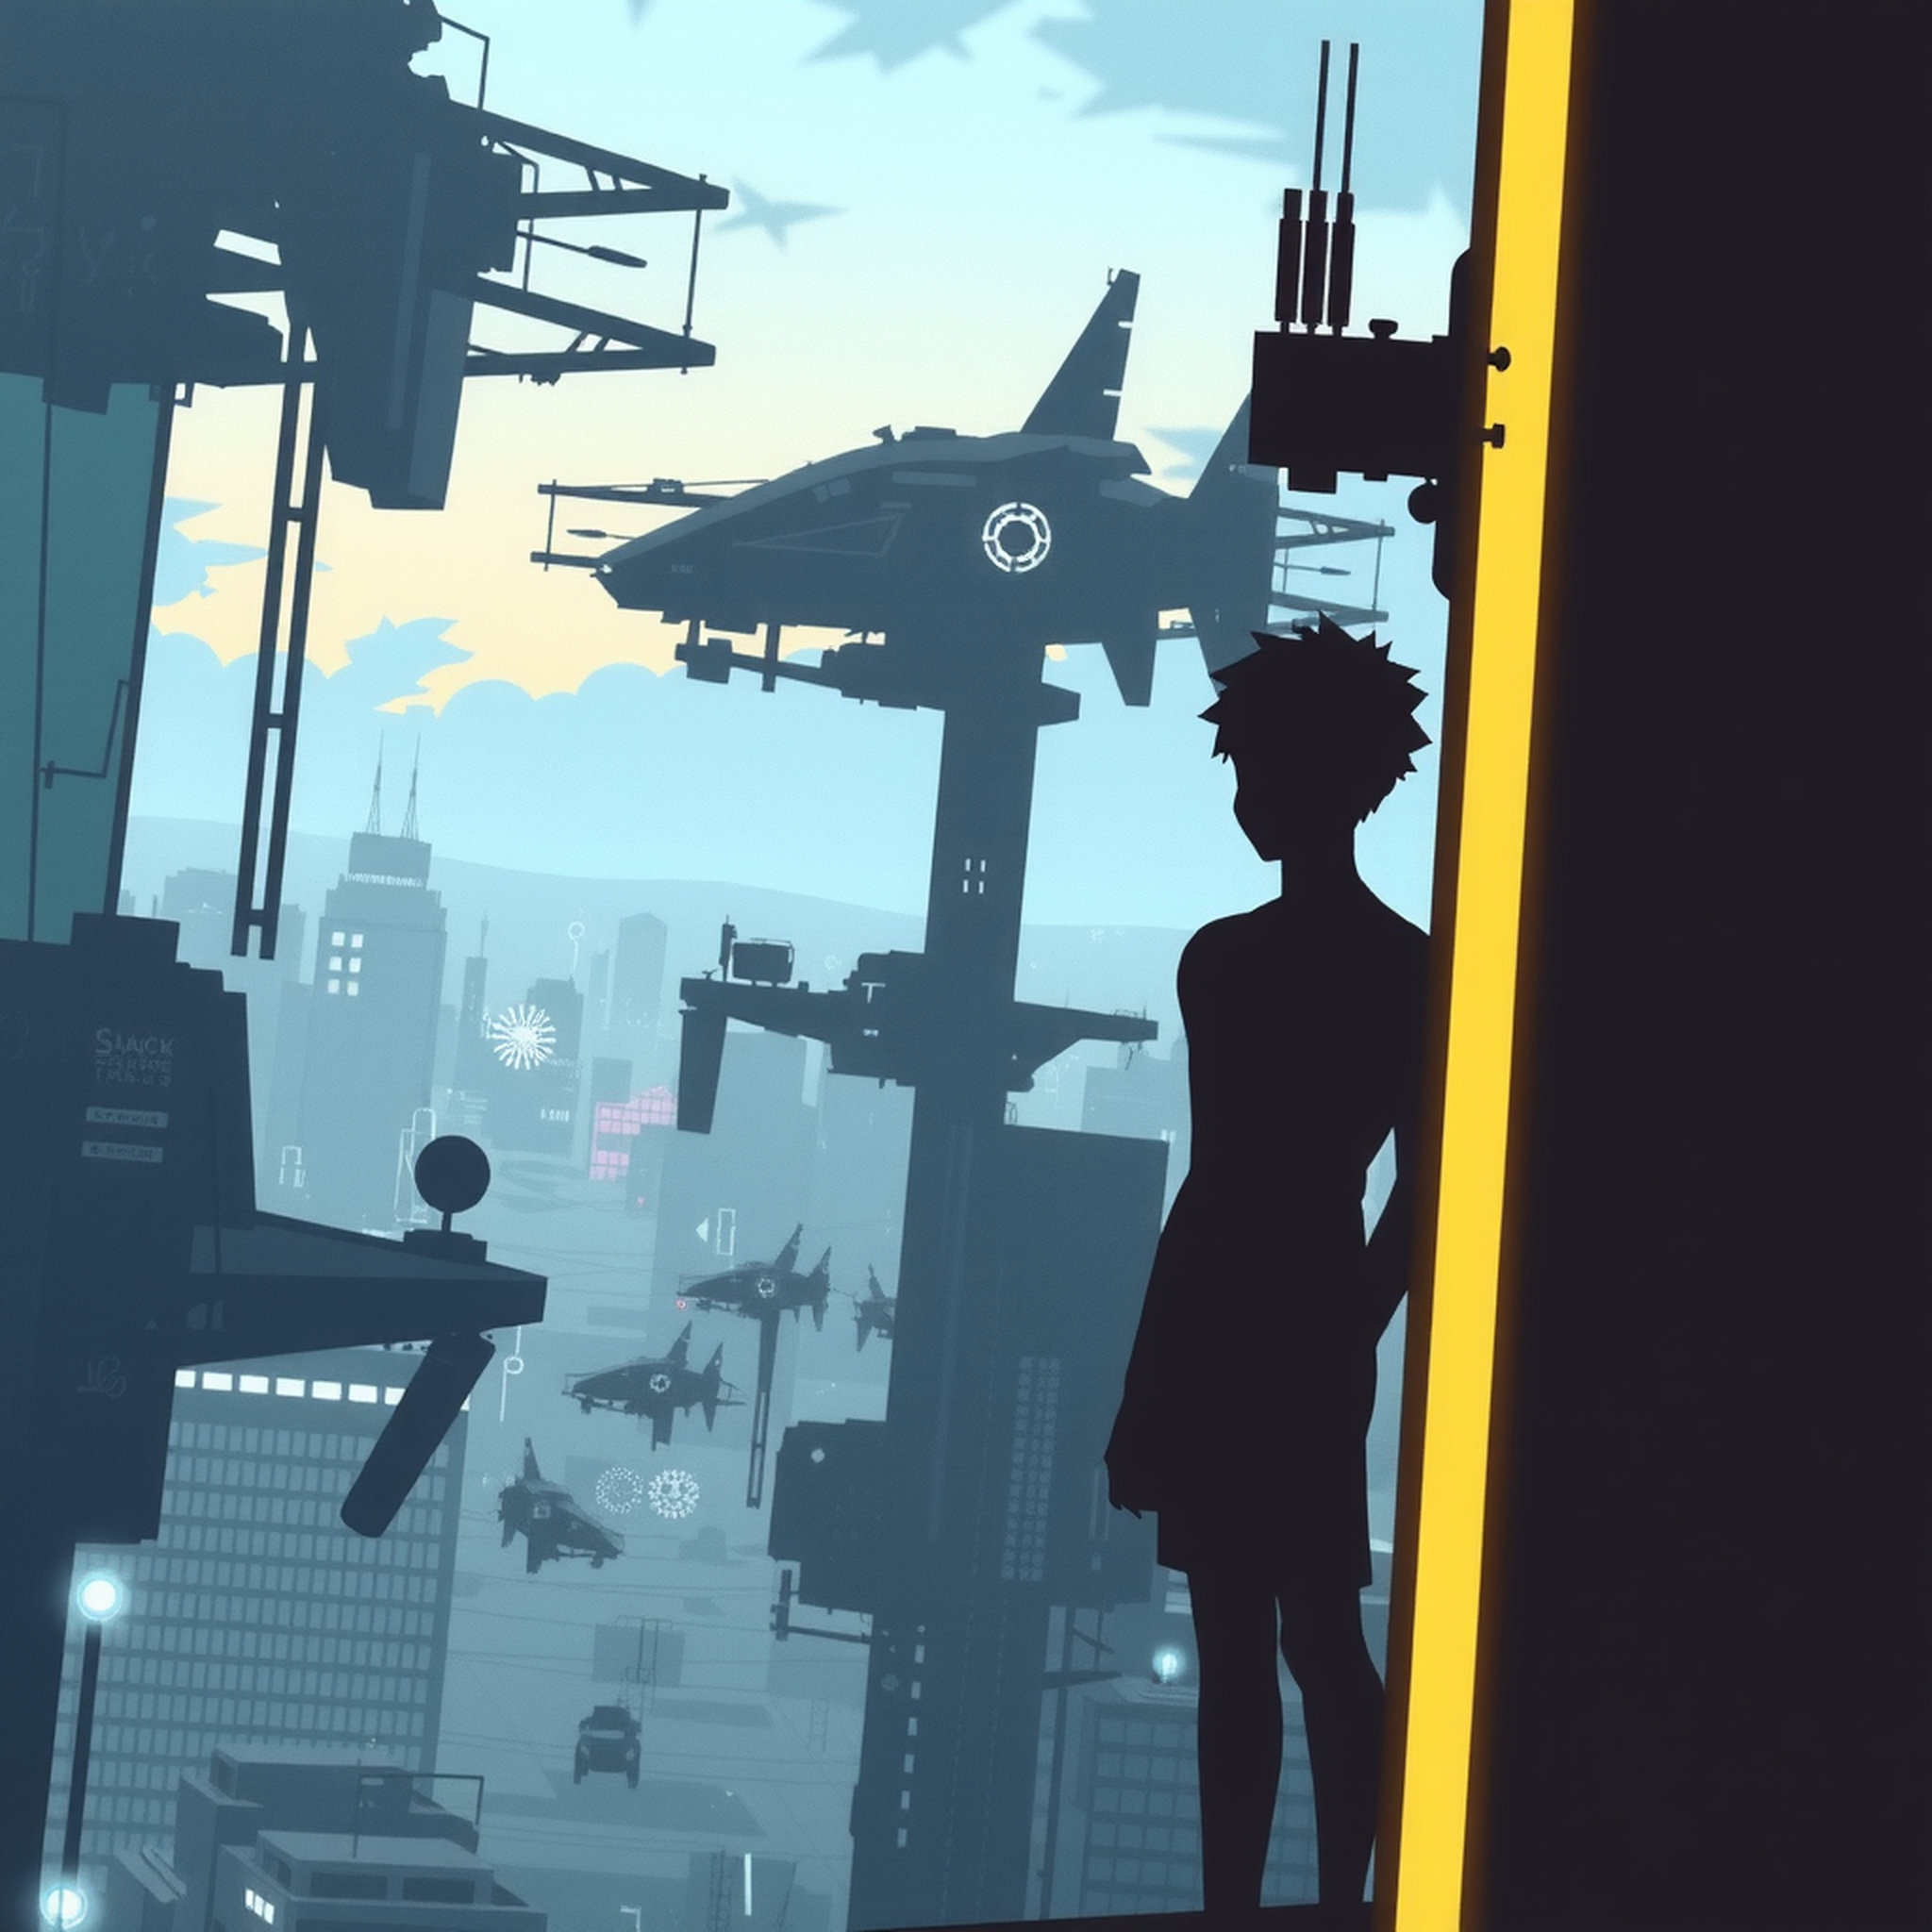
“Atomix Flux UNet” modified Workflow
CivitAI creator AlexLai has released a very impressive "Atomix FLUX Unet txt2img Workflow” for generating images using the “Atomix Flux Unet” model (a v2.0 of the workflow was released recently). This workflow provide some Upscaling features. From my experimentations, those features unfortunately do not carry to the Lora we have trained earlier in that the face is altered by the upscaling. As such, I have truncated (removed the upscaling) from the v1.0 workflow to use the model and use it with our custom trained lora. An image generated with the workflow is available below:
In this post, we will run FLUX.1 [dev] within ComfyUI, proposing two installation methods: 1) with Dockge to run the tool within a docker compose; a server-compatible installation method, 2)using Stability Matrix, a desktop application with easy model integration with multiple inference engines available.
This post details the build as a container of Automatic1111 and its integration as an image generator option for the “Ollama with Open WebUI” installation.


![FLUX.1[dev] with ComfyUI and Stability Matrix (20250126)](https://imagedelivery.net/IEMzXmjRvW0g933AN5ejrA/wwwnotionso-image-prod-files-secures3us-west-2amazonawscom-ed175516-6d97-436e-aa46-cdf22facffbd-aa5c4a72-2145-4e6e-977c-ecabdeee3fc4-20240810-flux1devjpg/public)

